Home Sweet Home Sign {Tutorial}
Home Sweet Home…..that's what matters most to me. Today I'm sharing my Home Sweet Home Sign Tutorial.
I'd rather be home than anywhere else on earth. It's comfortable, familiar and safe from the outside world. No, I'm not some hermit crab, but I am a homebody….especially during the colder months. When I thought of this, Home Sweet Home came to mind! Off to Picmonkey I went to design something for my sign. No worries, I'm sharing it with you below to use!
This is the first project that I completed with my Kreg Jig. I actually made this mid December, but just getting around to sharing it with you. In February, I shared a very simple sign project using Mod Podge with the left over wood from this project that you can find HERE.
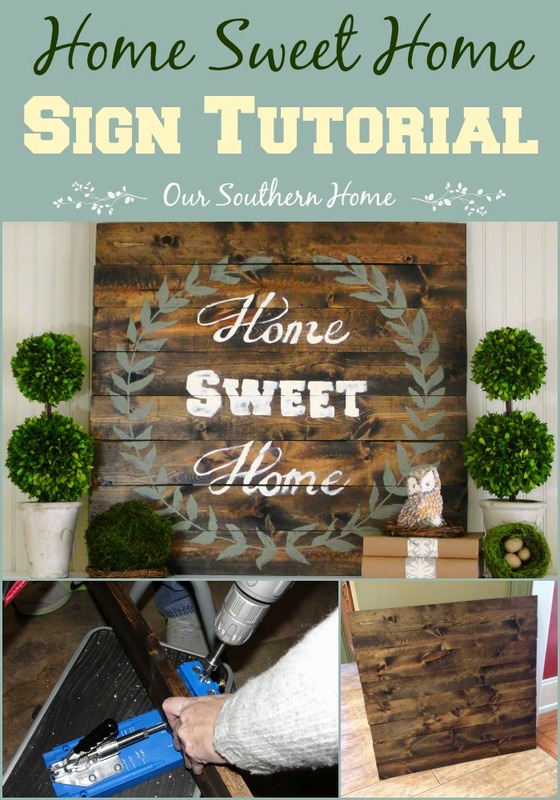
You can make your sign any size to fit your intended space. I knew I wanted this to go over a mantel so I measured the space. I used inexpensive Top Choice from Lowes Home Improvement in 1x4x6 foot lengths. Lowes can cut these for you or you can easily cut with a hand saw. That is what I used. Ashlyn ran over each board quickly with the palm sander.
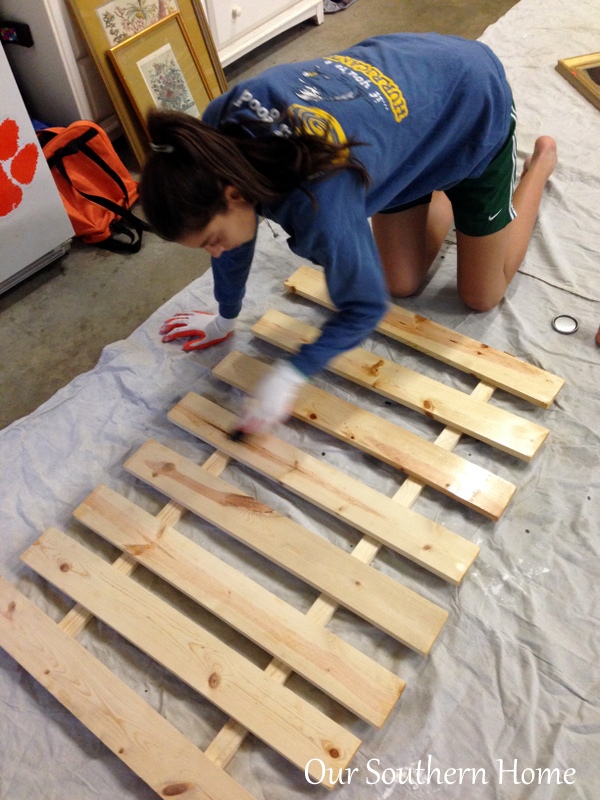
The boards were next quickly coated with Minwax Pre-Stain wood conditioner. It's great for new wood and helps prevent blotchiness.
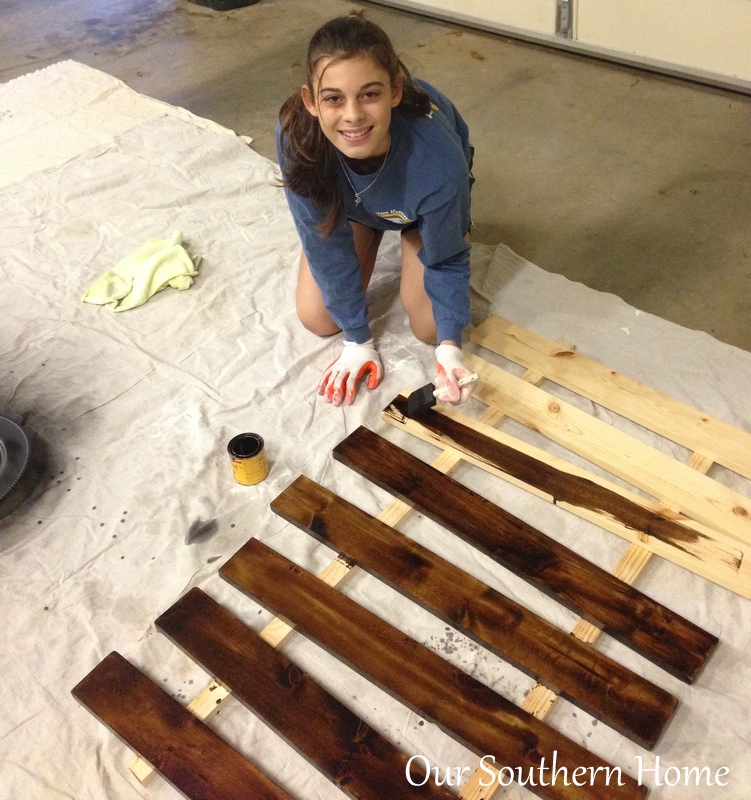
After that dried, the boards were coated with a couple of coats of Minwax Wood Stain in Dark Walnut. A foam brush was used only because I was out of rags! I highly recommend the rags or staining pad opposed to the foam brush. It is just too drippy and runny….hence the sloppy backside look….but no one will see it!

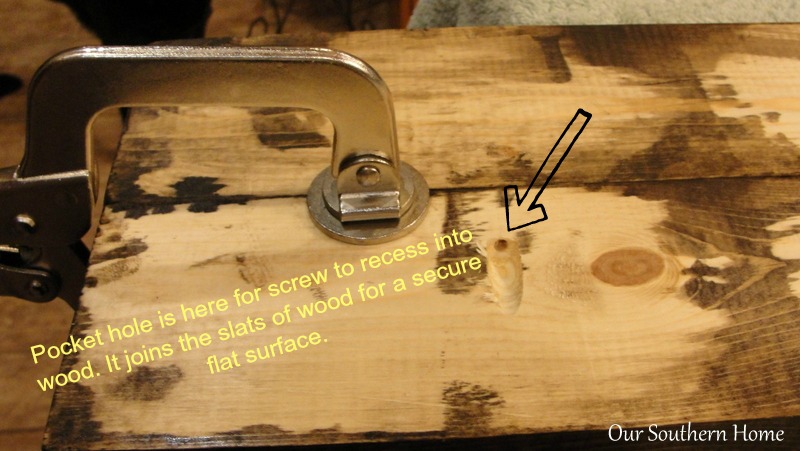
After the stain had thoroughly dried, we joined the boards using my Kreg Jig. This tool makes joining wood together seamlessly a breeze!!! I highly recommend it! If you do not have the Jig, you can attach the boards with 2 or 3 furring strips on the back with screws depending on the size and support needed. Click–>>You can find Kreg Jig on Amazon.![]()

The boards are secured in place. The holes are drilled in the backside. I did 3 across since this is a large sign.
Excuse the messy underside. My sign is meant to lean against the wall. You could easily add your choice of hanging hardware.
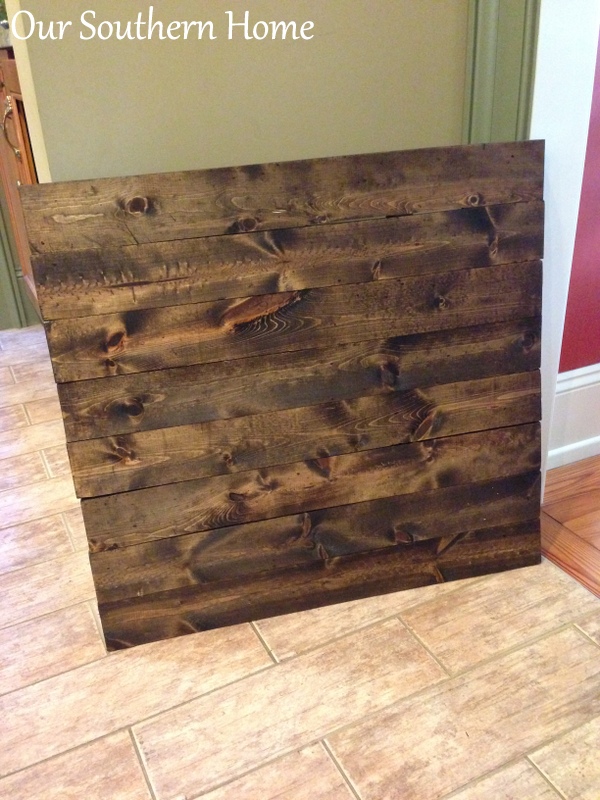
All joined and ready for the decorative paint treatment
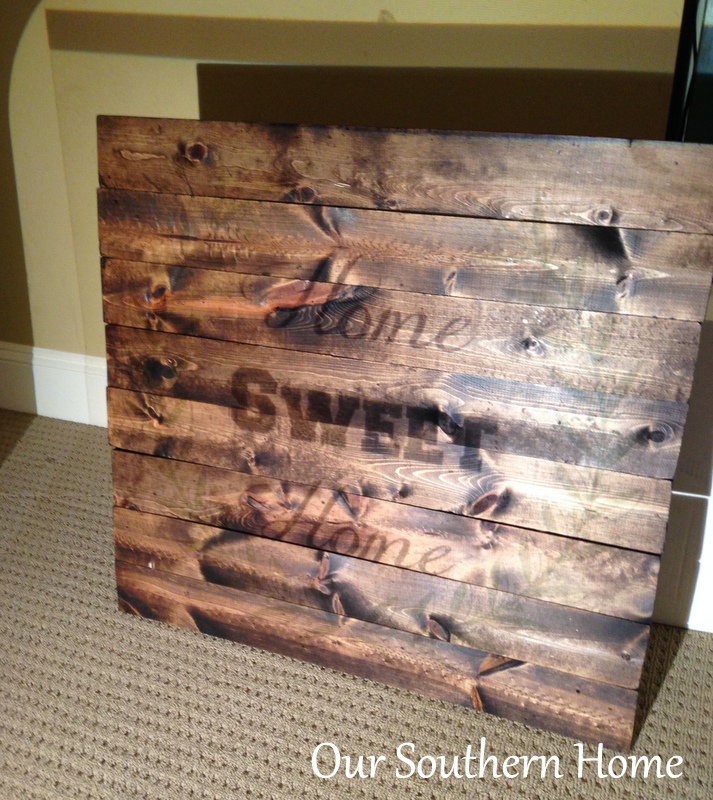
If you follow my blog, you know I love to use my thrift store overhead! I use for any paint project or chalk art that requires a large space.
I use oil pastels to draw the design in the color closest to the paint I'm using. Paint goes over it easily and they are so smooth to draw with.

Click HERE for the HOME SWEET HOME image to print or use the file. I found my overhead at my local thrift store for around $25. You can find them in thrift stores and on CraigsList.org. It makes transferring larger graphics onto signs, chalkboards, furniture, etc. a breeze! I have a pack of overhead transparencies from my teacher days that print through my ink jet printer. They can be found online and in office supply stores. They are not cheap, but come with a lot! Go here to see assortment at Amazon—>> Inkjet Transparency Film![]()
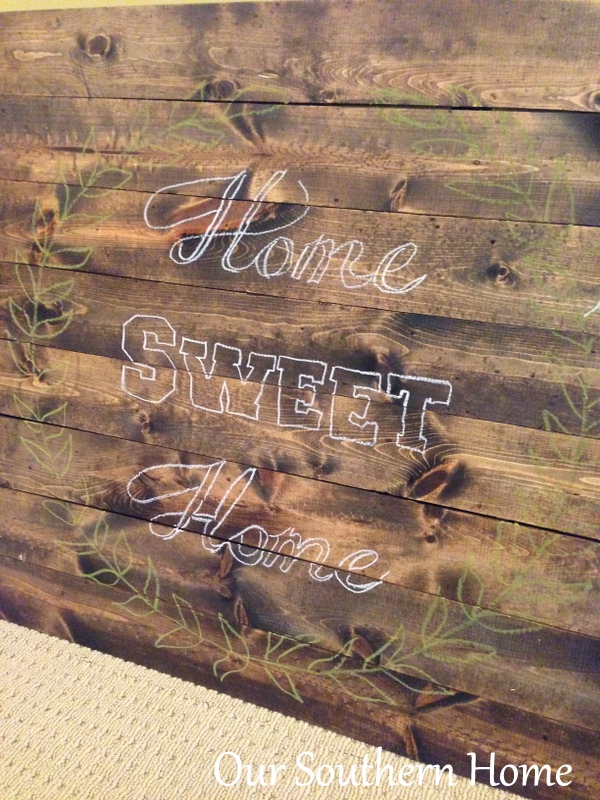
On the laurel circle, I just roughly follow the outline not trying to trace perfectly. I mainly used the overhead as guide for the ring. I traced the ring and drew in the laurel leaves.
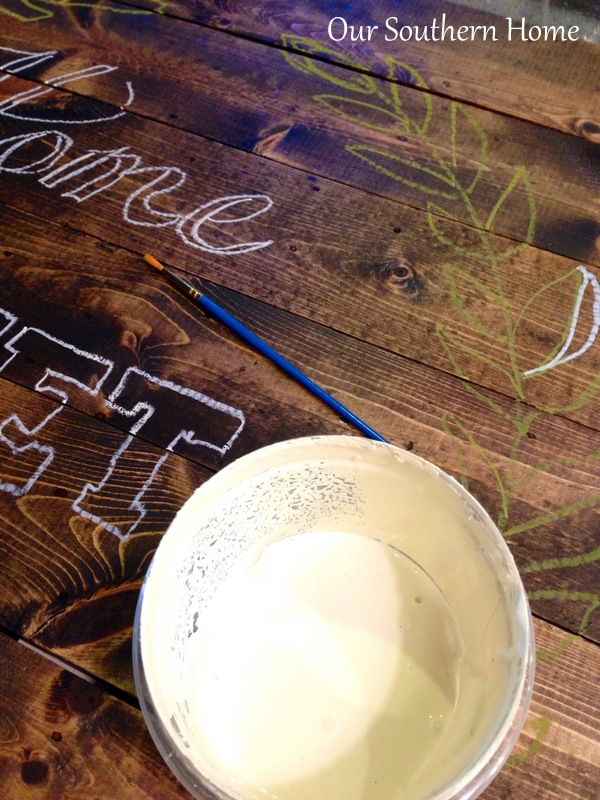
The tracing took no time at all! I painted the design with Annie Sloan Chalk Paint. The letters are Old White. The laurel is Chateau Grey.
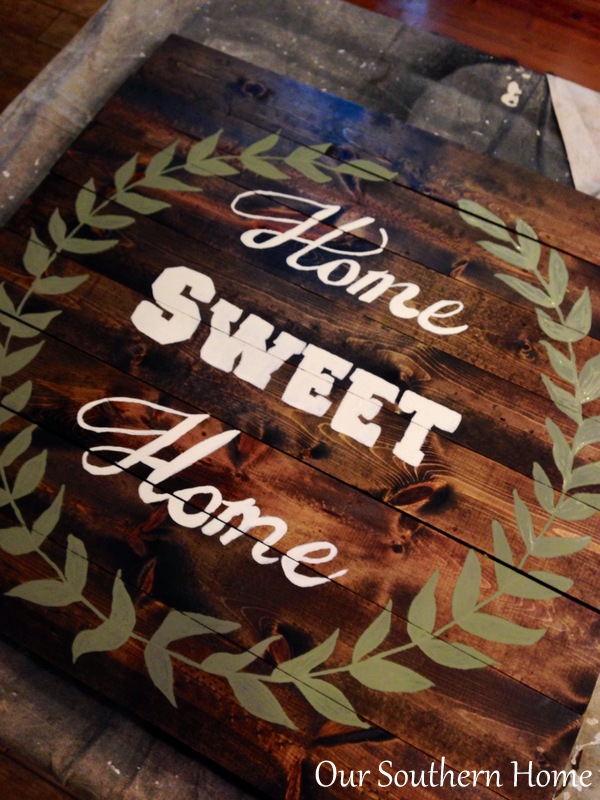
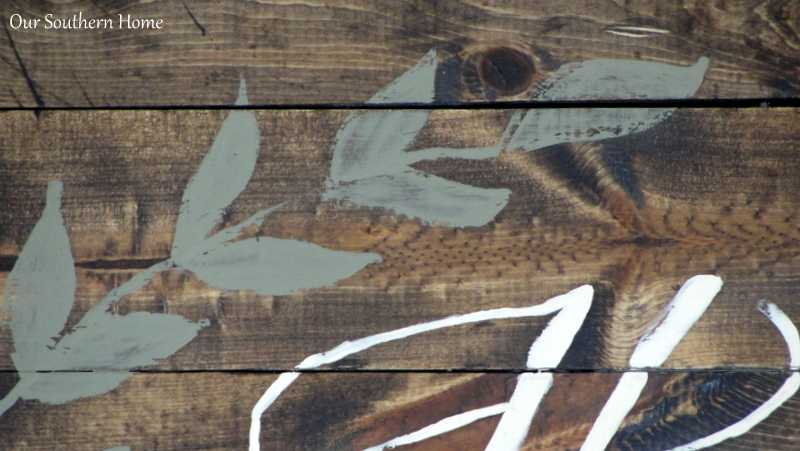
I did one heavy coat and let it thoroughly dry. I then took a sanding block and distressed the lettering and laurel. Dust it off. I then applied a coat of Minwax Wipe-On Poly in Satin to protect it.
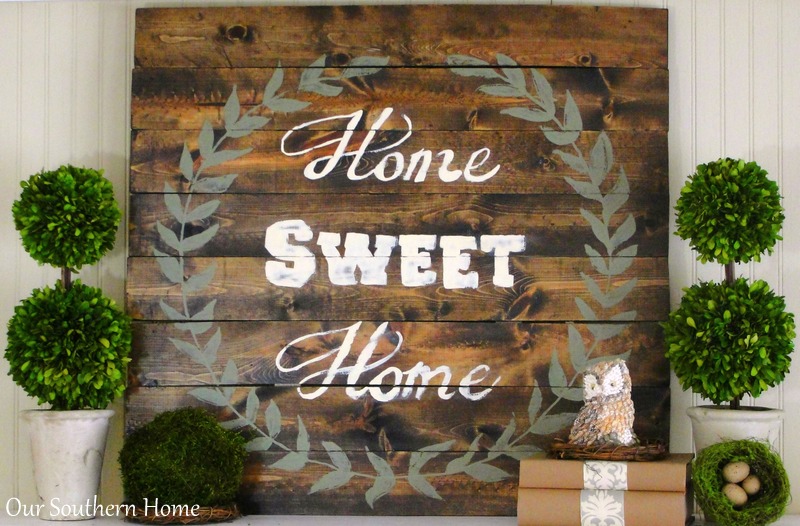
This mantel is now ready for an everyday look that will carry you through spring and summer!

Just some light distressing was done.
Let me know if you have any other questions!
Are you on Instagram? I share lots of behind the scenes there! I'd love for you to follow along!


Link Parties that OSH parties at on occasion! Sunday: DIY Show Off Monday: Between Naps on the Porch, Home Storis A to Z Tuesday: Not Just A Housewife, The Scoop at Cedar Hill Farmhouse and Inspire Me Party at A Stroll Thru Life, Setting for Four – Project Inspire{d}, My Uncommon Slice of Suburbia Wednesday: Savvy Southern Style Thursday: My Repurposed Life, From My Front Porch to Yours, Home and Garden Thursday at A Delightsome Life ,No Minimalist Here , Imparting Grace Friday: French Country Cottage, Miss Mustard Seed Furniture Friday, Common Ground, The Charm of Home, Rooted in Thyme, Imparting Grace, Keep Calm and Link Up, My Romantic Home – Show and Tell Friday, Craftberry Bush – Inspiration Gallery Friday, SnapCreativity – Show and Tell, Tatertots and Jello
Buffer


Beautiful sign!….I so remember using an overhead many years ago for things that I used to paint on the walls in my son’s room….I would borrow it from work and take it home on the weekends!….Great project and beautiful job!
This looks great! It would be a perfect piece to put on top of my mantle if I didn’t have a huge TV over it.
Love the idea of using a projector.
Deb@
Seeking Lavender Lane
Thanks, Deb!!! Be on the look out for an overhead. I’ve gotten such great use out of it!!! Happy DIYing!! Christy
Love this awesome sign, thanks for sharing at Inspiration Monday 🙂
Debbie
This is beautiful! Great tutorial! We would love for you to share with us at Your Designs This Time!
Nice work, Christy! And smart to use the Minwax Wood Conditioner. Good luck on future projects.
-Bruce
Thanks so much, Bruce! Love using Minwax products! It really was one of my favorite projects. Happy Spring! ~Christy
You did an amazing job on this sign.. so perfectly done. I found your blog on Sisal and sand and I am glad I did..Will keep your in my favorites… Have a wonderful weekend.
Thanks for the great inspirationon the DIY
Thanks so much!!! I’m ready to try my hand at another! Happy spring! ~Christy
I recently did a backdrop similar to this!
http://www.nestofbliss.com/2014/02/diy-pallet-squarebackdrop.html
I LOVE how you turned yours into a beautiful sign! I have to say that’s something I considered… I may have to make another one with something on it. 🙂 You did a great job, it’s beautiful!
Thanks so much!!! I need to make one for a backdrop!!! Great idea! XXOO Christy
Love your sign Christy! Thanx for sharing it at THT.
This is a wonderful tutorial, Christy. I will be featuring your post in this week’s Home and Garden Thursday,
Kathy
What a great idea! Thanks for sharing 🙂
Thanks so much! XXOO Christy
I absolutely love this! I’m looking to make some distressed wooden signs to decorate a couple spots in our house, and this is a perfect look!
Thanks so much!!! First major sign project and now I’mm officially hooked! ~Christy
What a gorgeous sign! Love it.
Thank you so very much!!! ~Christy
Your sign is beautiful. If you have not shared your art at Bacon Time linky, I would love for you to. Have a great end of the week.
Thanks so much, Mindie!!!! Thanks for the invite! 🙂 Christy
Hey Christy- i am a homebody too!! Love the sign and everything that it represents for you and your sweet family.
Your “Home Sweet Home sign looks great. Thanks for sharing the tutorial with us.
Helen
Thanks so much! I am so enjoying decorating with it!!! XXOO Christy
I love this sign! I’ve had a tab for your post open since yesterday & this is the first opportunity I’ve had to read it:) I also have serious Kreg Jig envy! I’ve wanted one for so long! I’ve pinned this wonderful project!
I love this! Home is definitely the place where I like to be.
Oh my word Christy!! I love this so much and I’m ready to place my order for you to make one for my house! 😉 Seriously though its totally amazing!
Vanessa
Oh, my…Thanks so much Vanessa!!! You’ve made my day!! It was such a fun project. I love signs!!! XXOO Christy
What a great looking sign, that came out very well!!
Thanks so much, Heather!! I’m kind of on a sign kick these days! So affordable and simple to make! XXOO Christy
Christy,
This turned out great and it’s beautiful. You are awesome like that. : )
Vanessa!!! Just love you. Many thanks to my amazing friend!! XO Christy
This so great. PINNED!
Cy nthia
Thanks bunches, Cynthia!!! It is definitely a favorite project! XXOO Christy
LOVE IT Christy!!
Thanks so much sweet friend!! I’m sure you are really ready for spring!! ~Christy