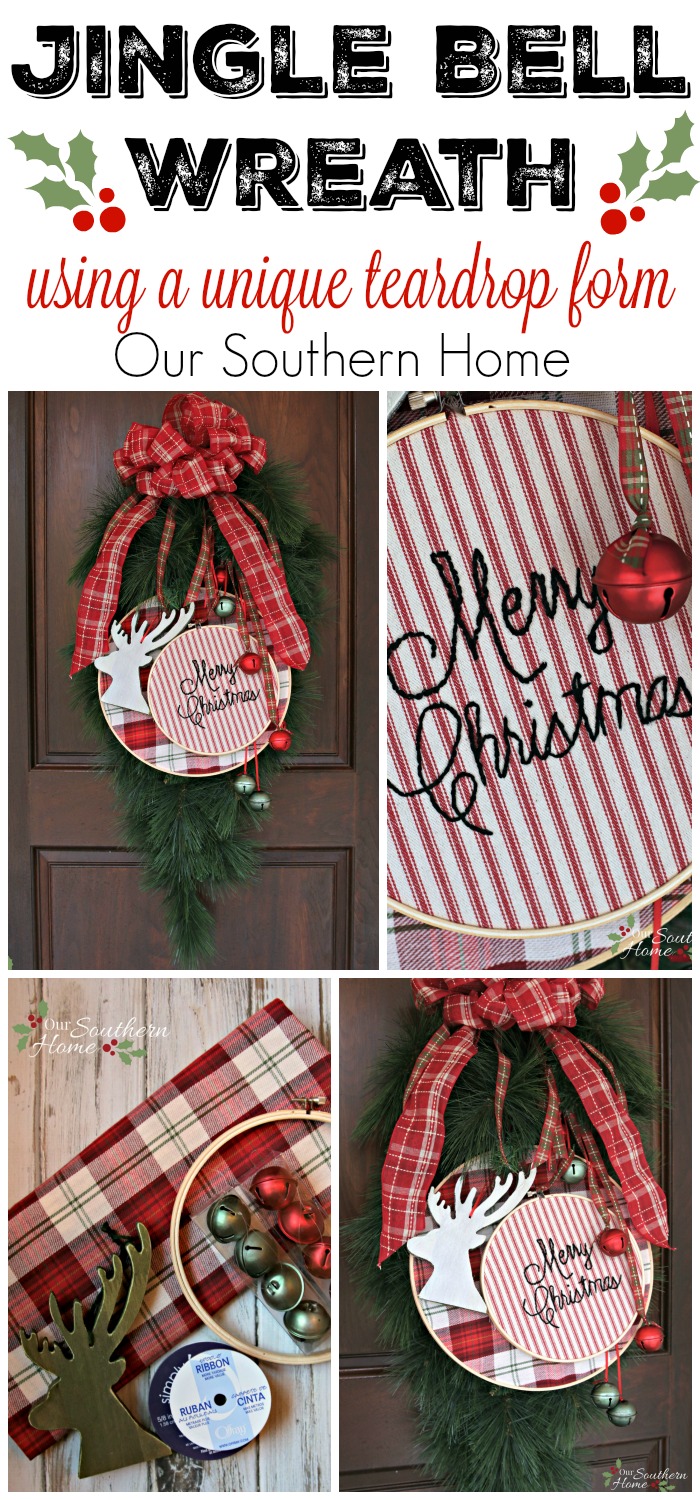
Jingle Bell Wreath
The pine needles have been a flyin' at our house. It has been full on Christmastime over here!
It's a ball of exciting, fun and stressful rolled into one! BUT……I love it.
There is just something about white lights everywhere that makes me happy.
Another thing that makes me smile is my new Jingle Bell Wreath! Do you ever finish a project, stand back and pat yourself on the back. That doesn't always happen. Just ask me about the decoupage fabric balls I made recently. Let's just say that you are better off using a light fabric that is not flannel!
This week I am excited to be participating in a Christmas Ideas Tour organized by my sweet friend, Kathy, from Petticoat Junktion.
Each day is a different theme. The entire schedule is below. Don't miss theses fabulous ideas! Today it is all about the Christmas Wreath.
Every year I pretty much use the same wreath on the front door. I might change it up a bit, but essentially it has been the same for a…..long…..time. My crafting process can be a bit odd. I don't always go to the store with a list of exactly what I want to do. Sometimes I may have something in mind. I knew I wanted to incorporate plaid fabric….that was about it.
I usually wander around looking, playing and scheming.
Sometimes I even take a photo of my supplies just to end up adding to it along the process. Sorry about that…you've been warned. Wink, wink!
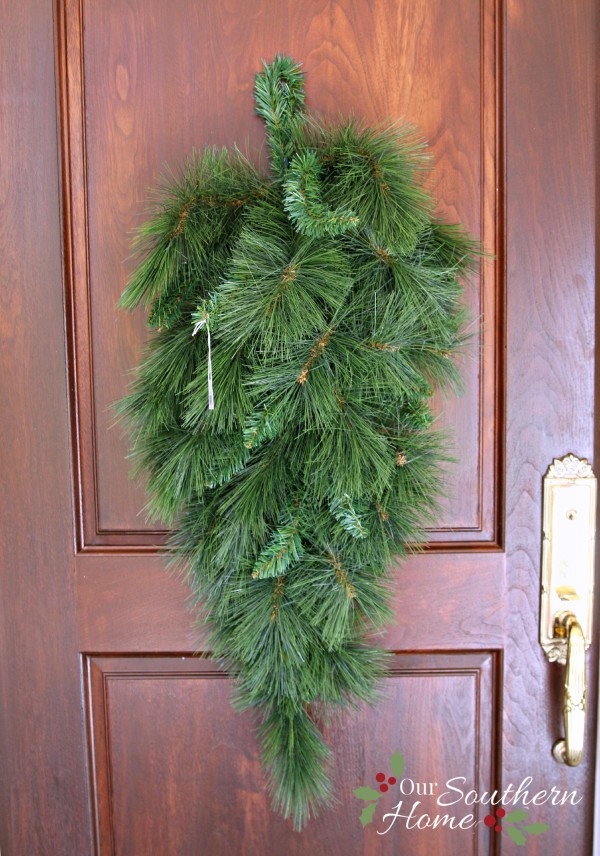
I knew when I came across this teardrop wreath form on sale for $12 at AC Moore that I had a winner. It even has a nice large loop at the top for hanging and tying things to.
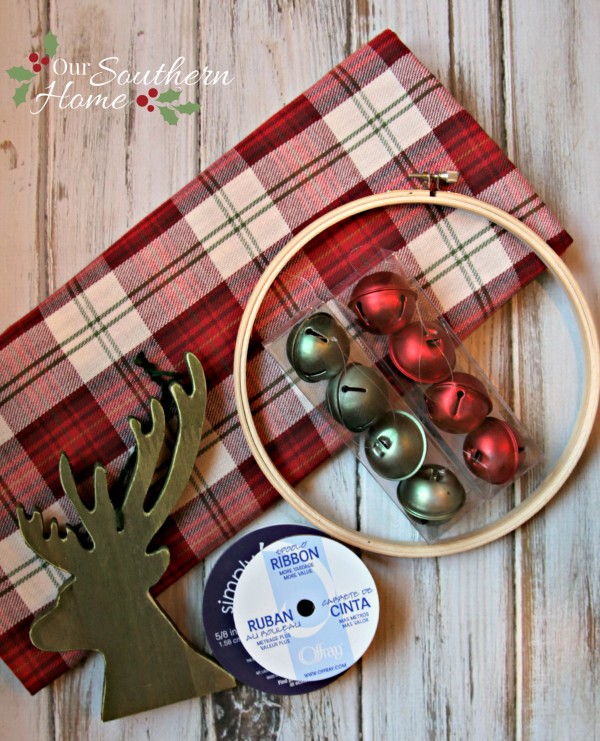
I started out with these items, but I ended up adding to it!
You will need the following: (contains affiliate links)
- teardrop wreath form (AC Moore)
- plaid fabric from TJ Maxx
- wooden deer ornament from Target
- bells from Target
- plaid and red ribbon from AC Moore
- embroidery hoops in 2 graduated sizes
- small amount of red ticking fabric (my stash)
- scissors
- needle with eye
- black embroidery floss
- Merry Christmas printout
- pencil
- carbon tracing paper
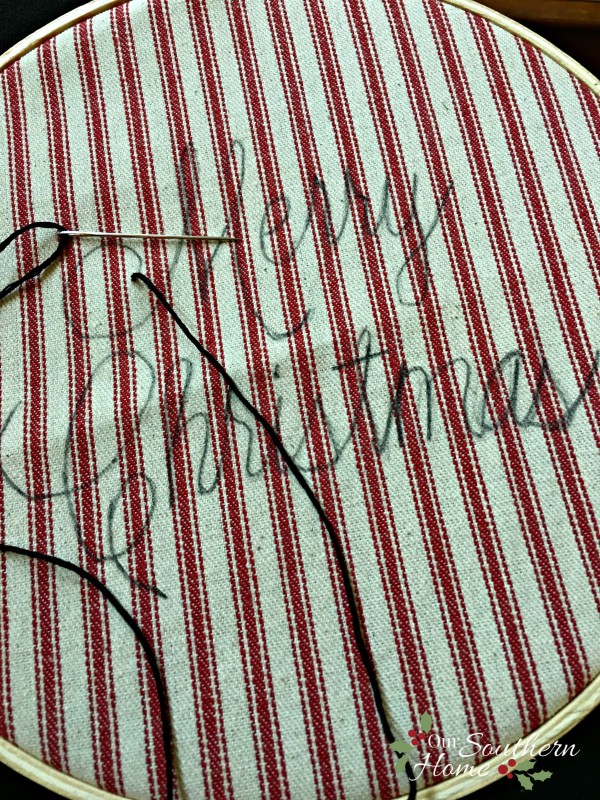
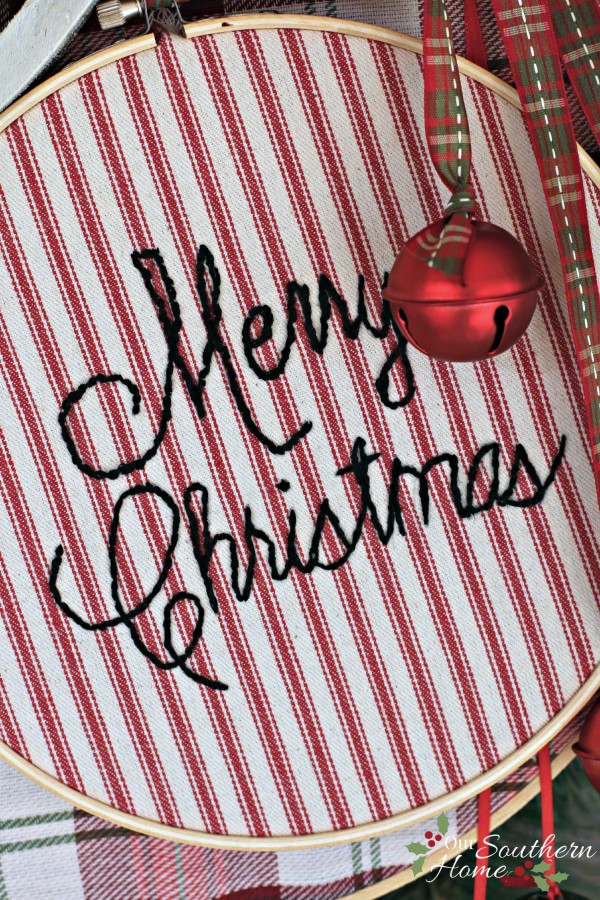
All you need to do is pick a font and print it on printer paper from your computer. I used a size of 300 here.
Use the carbon tracing paper to transfer it to the fabric. It transferred fairly lightly. I went back over it with pencil to darken. I've become blind as a bat. Yes, I'm wearing readers on the tip of my nose so I can look over them to watch Love Actually while I embroidered this.
Before you say you can't do this….wait! I'd never done it. I simply threaded a strand of the black floss and went to town. I did find that to make curves, I had to go around the letter with smaller stitches. I was originally just going to print this on iron on transfer paper like TAP to adhere it. I so love how much bolder the floss looks instead, but I love my TAP for doing iron on transfers.
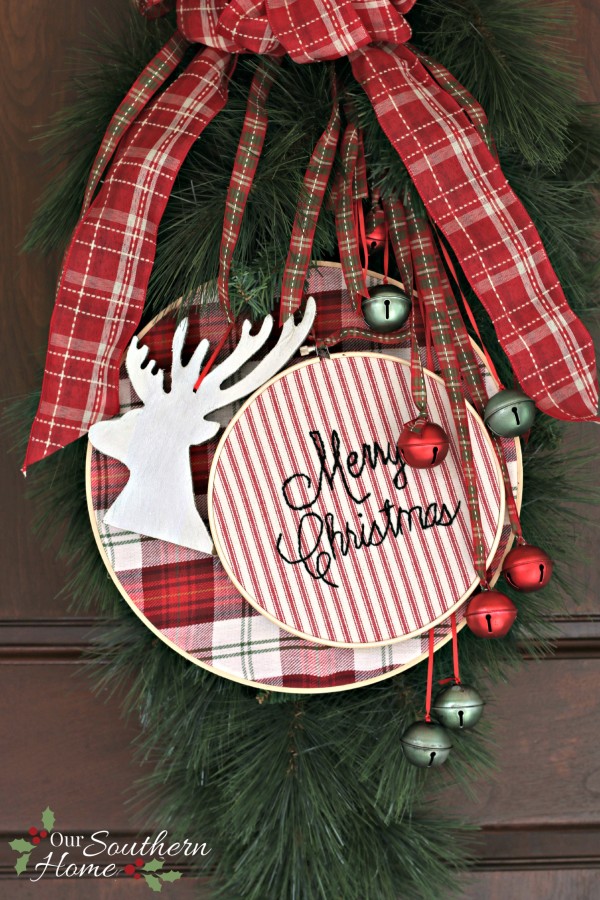
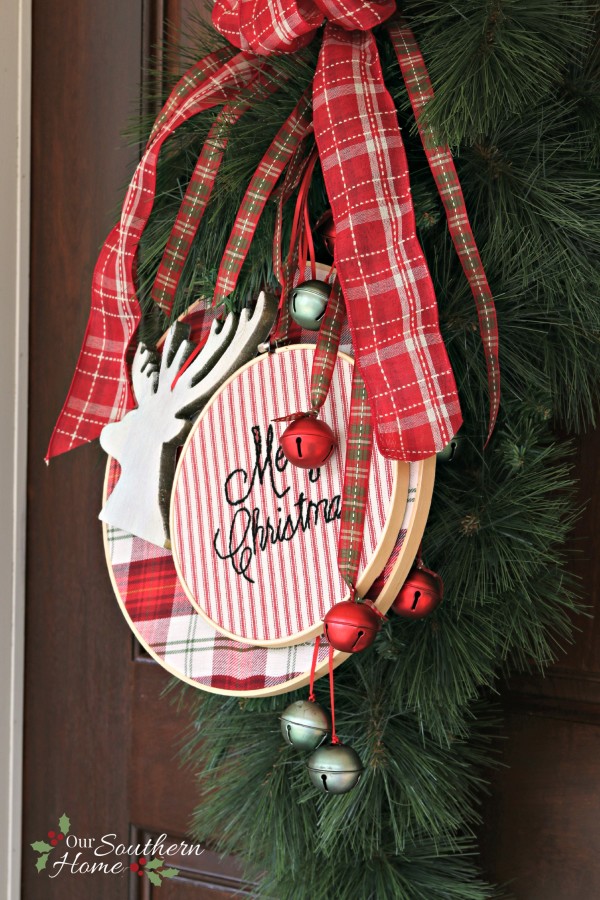
Lucky for me that I had an extra, larger embroidery hoop in my craft stash. This enabled me to add 2 fabrics. The plaid is from a tablecloth from TJ Maxx. It was like $7.99 and had been great for crafting. Use you ribbons to tie around the hook on the hoop and then tie it to the loop at the top of the teardrop wreath.
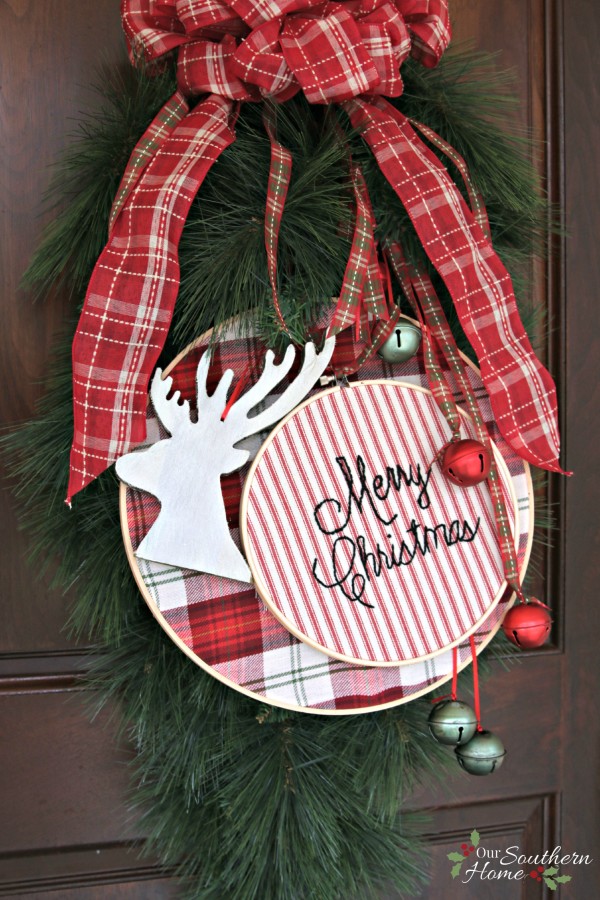
Then I tied the plaid ribbon to the red bells and the red ribbon to the green bells. I then tied them to the top loop at varying heights for interest.
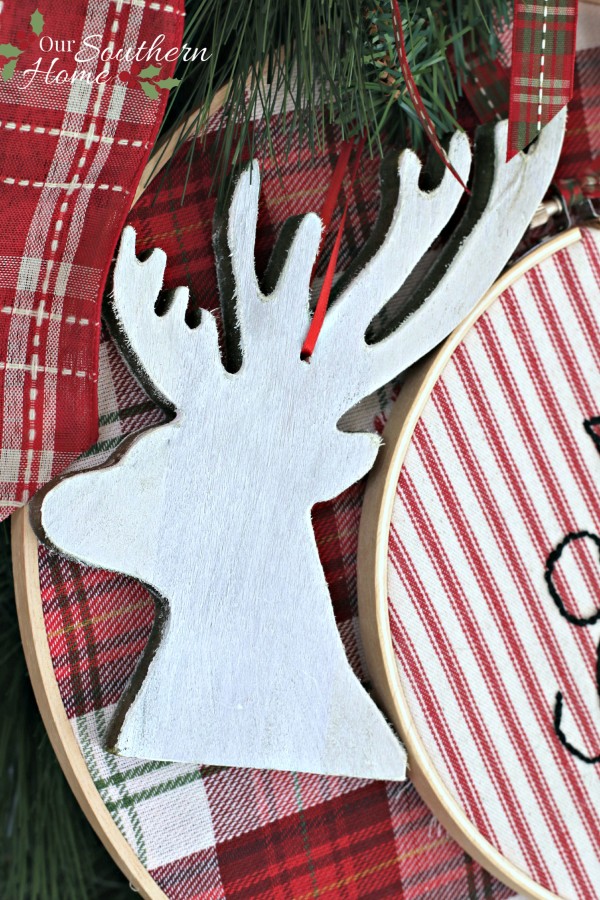
I LOVE this large wooden reindeer from Target. I just didn't like the green color with my wreath. I brushed a quick coat of pure white chalk paint on it and them immediately took a paper towel and wiped it off. I didn't want it a solid white. The wood grain still shows through. Notice I didn't paint the edge, just the top. I also removed the twine hanger and added my ribbon.
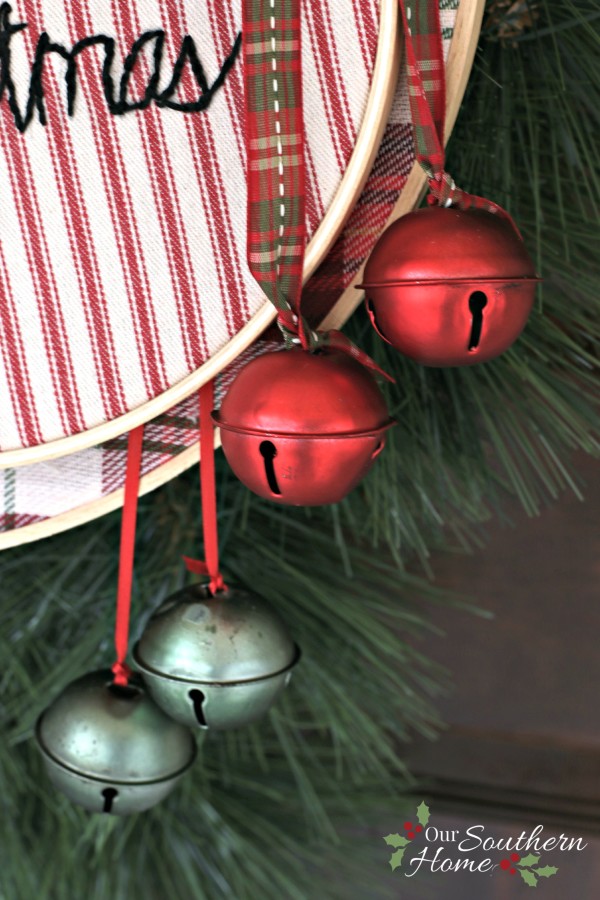
The bells have a vintage, metallic patina to them. They slightly jingle as the door is open….I love that.
It's a nice large and full wreath for my front door. I love that it is so different from your traditional round door wreath.
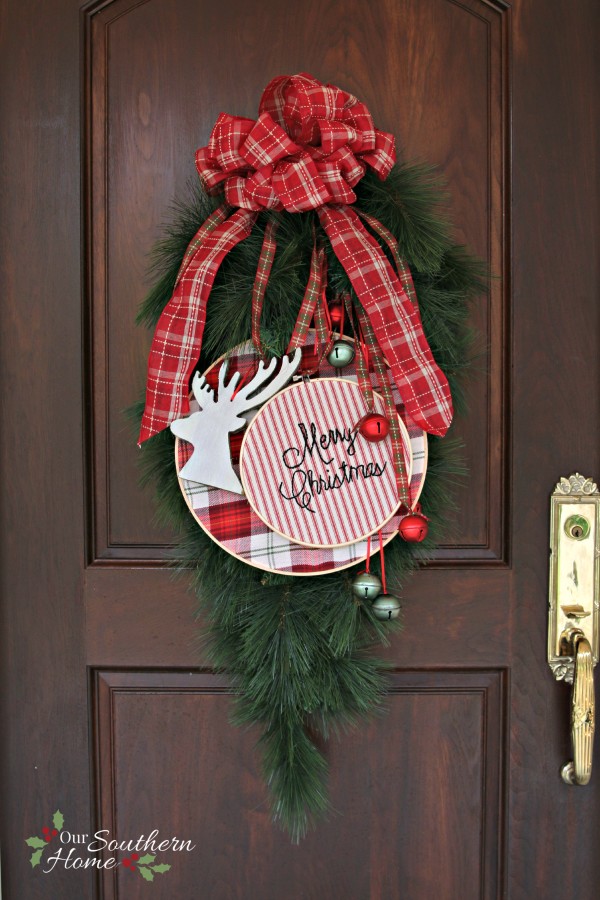
It really assembled very quickly. No glue or floral wire. The embroidered lettering was the most time-consuming, but I completed while watching my Christmas movie. Don't fuss with…it's homespun after all!
You'll probably be seeing this wreath again in the upcoming years.

The combinations of different plaids and stripes blend nicely together.
Don't forget to PIN the above image for later! Thanks so much!!!
Go check out all of the other projects featured this week. Thursday will be Thrifty Crafts!
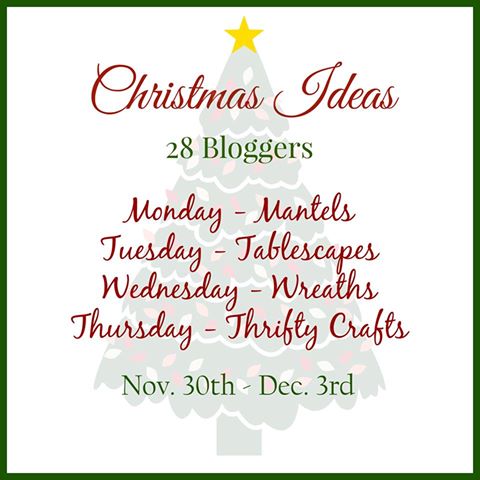
Monday – Mantels
Petticoat Junktion
My Creative Days
2 Bees in a Pod
Restoration Redoux
Atta Girl Says
Art is Beauty
Cottage at the Crossroads
Housepitality Designs
Shabbyfufu
Tuesday – Tablescapes
Postcards from the Ridge
Town and Country Living
Hunt and Host
Savvy Southern Style
All Things Heart and Home
HighStyle Restyle
This Makes That
Wednesday – Wreaths
Domestically Speaking
Our Southern Home
Mad in Crafts
H2O Bungelow
Sweet Pea
Around The Watts House
Thursday – Thrifty Crafts
Dukes and Duchesses
Confessions of a Serial Do-It-Yourselfer
Prodigal Pieces
The Interior Frugalista
Cupcakes and Crinoline
Girl in the Garage
I’d love for you to follow along on social media!
–>> Facebook | Pinterest | Instagram |Twitter|Google+

Home Stories A to Z Not Just a Housewife Kammy’s Korner The Happy HousieDesign Dining and Diapers Liz Marie Blog Funky Junk Interiors Savvy Southern StyleTatertotsand Jello DIY Show Off Redoux Interiors Between Naps on the PorchThe DIY DreamerOh My Creative Little Miss Celebration Just a Girl and Her Blog Sand and Sisal InteriorFrugalista House on the Way Addicted 2 DIY I should be Mopping the FloorMiss Mustard Seed Stone Gable- The Scoop Inspire Me Tuesday Feathered Nest Friday Treasure Hunt Thursday Northern Nesting
Buffer

Just gorgeous Christy! Love how all of the pieces come together to make a one of a kind beautiful wreath. I am so inspired to do some needlepoint right now. Thank you for the inspiration!
I love this wreath, very cute!
Chris
We must be on the same wavelength repurposing swags! What a great idea using as a wreath and I’m completely mad for the plaid!
This is such and adorable wreath! It’s so fun and festive and looks like something even I could do. Thanks for sharing it!
How adorable! I love it!
Wow Christy – this is adorably amazing! Makes me feel like I could even embroider. Love the two fabrics! Pinned!!!
I use a teardrop swag, too, but yours is so super cute!!
Oh Christy that is too cute! Love all the layering of Christmas goodness!
I LOVE LOVE LOVE this swag, Christy!! You are so creative!! XOXO
This is adorable! Wow, love the mixed plaid and ticking! SO pretty and unique!
That is one adorable wreath Christy – I love everything about it! Pinned to my Holiday Decorating board to share.
I’m in love!! I wish I had a smidgen of your creative talent!!
One of the very best ideas for a “wreath” that I’ve seen all season. You are so talented. I’ve been looking for something different and this just may be it. Good work!!
I love this, Christy! I’ve never seen tear-dropped Christmas greenery like this and really like the shape for a door wreath. Layering two embroidery hoops is a neat idea and one that I’m going to remember since I have a giant bag of hoops of various sizes that I bought at the thrift shop. You embroidery is the perfect touch to this display.
Adorable! Pinning and sharing! IT has been fun touring with you this week!
Simply beautiful wreath! Very clever using the embroidery hoops. They look great!