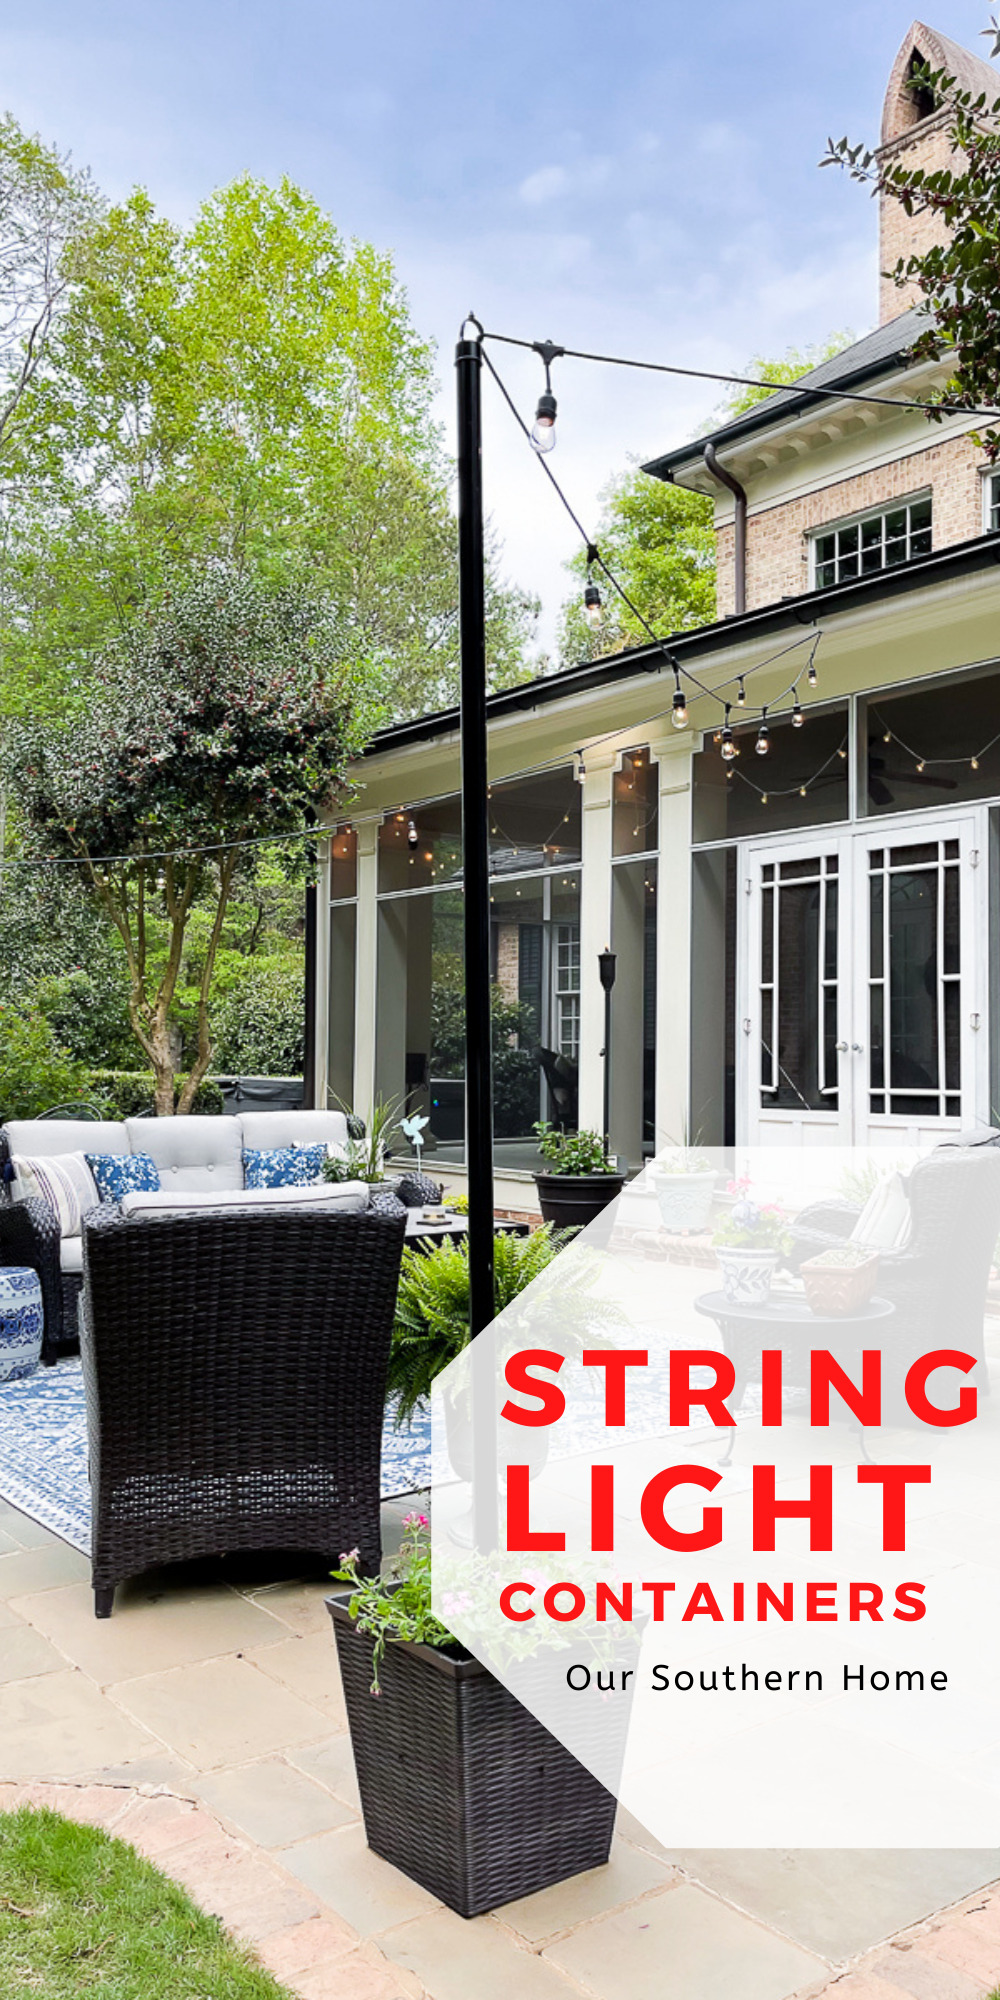
DIY String Light Containers for Your Patio Lighting
Create these DIY string light containers for your patio lighting with this beginner-friendly project to add ambiance to your space.
The post was updated on April 20, 2024.
Latest from OSH
- How to Make Piña Coladas in an Ice Cream Maker
- Saturdays on the Porch #86
- Saturdays on the Porch #85
- Easy European Wall Art with Thrift Store Frames
- Piano Bench Makeover with New Color and Fabric
This post may contain affiliate links. If you purchase something using one of my links, I may earn a small commission from the retailer costing you nothing more. You can read more on my disclosure page. Christy Little of Our Southern Home is a participant in the Amazon Services LLC Associates Program, an affiliate advertising program designed to provide a means for sites to earn advertising fees by advertising and linking to amazon.com.
DIY String Light Containers
I can't begin to tell you how many summers we have planned to install cafe string lights on our patio area. We had big plans last summer when we finally purchased our wicker seating area.
There is just something about the ambiance of string lights. It creates a magical space under the stars.
See more of outdoor spaces here.
I'm not sure why we didn't follow through.
I think the biggest issue was that I couldn't find the perfect container to house the pole.
I guess it was a hard choice with the entire process being relatively permanent with concrete.
We have a rather large patio area so the length of the lights from run to run would be rather long.
We've gone back and forth with the material that we wanted to use for the pole. There are many options.
Let's go back in time a bit to the start of my love affair with string lights.
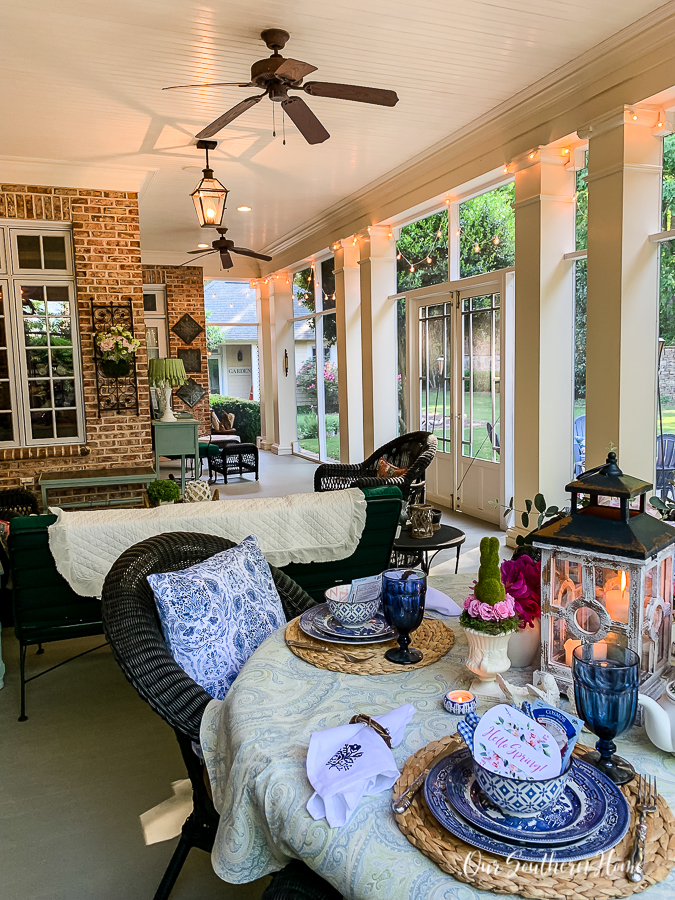
Screened Porch Lights
Before I even started blogging back in August of 2012, I installed white string lights on our screened porch. We LOVE those lights. I'd say that they have been up since about 2010. We even spray them with 30-second cleaner to remove dirt and grime from the white strands. They are lighter weight than the cafe lights. I have them on a handheld remote timer so they are easy to use. They have never gone out in all these years. I think we've had one bulb burn out and one bust when cleaning the porch.
The strand of those lights is enormous, but I didn't have to worry about stringing any together. They are hung in a scalloped format with cup hooks. You'll be able to see those in the photos. See my tip below about hanging.
I do not remember where I purchased those since it was pre-Amazon.
Hanging Tip: Use yarn or string to lay out your design plan for your screened porch if doing scallops. This will allow you to get the scallops even. Measure the string. This is the length of lighting that you need to purchase. When your lights come in, leave the string up as you install the scallops. There will be no guesswork as you install. You've done the hard work with the string. Do not install the bulbs until after the stands are in place. They are easy to break. I ordered a 100-foot run so that I would not have to deal with connecting strands on the screened-in porch.
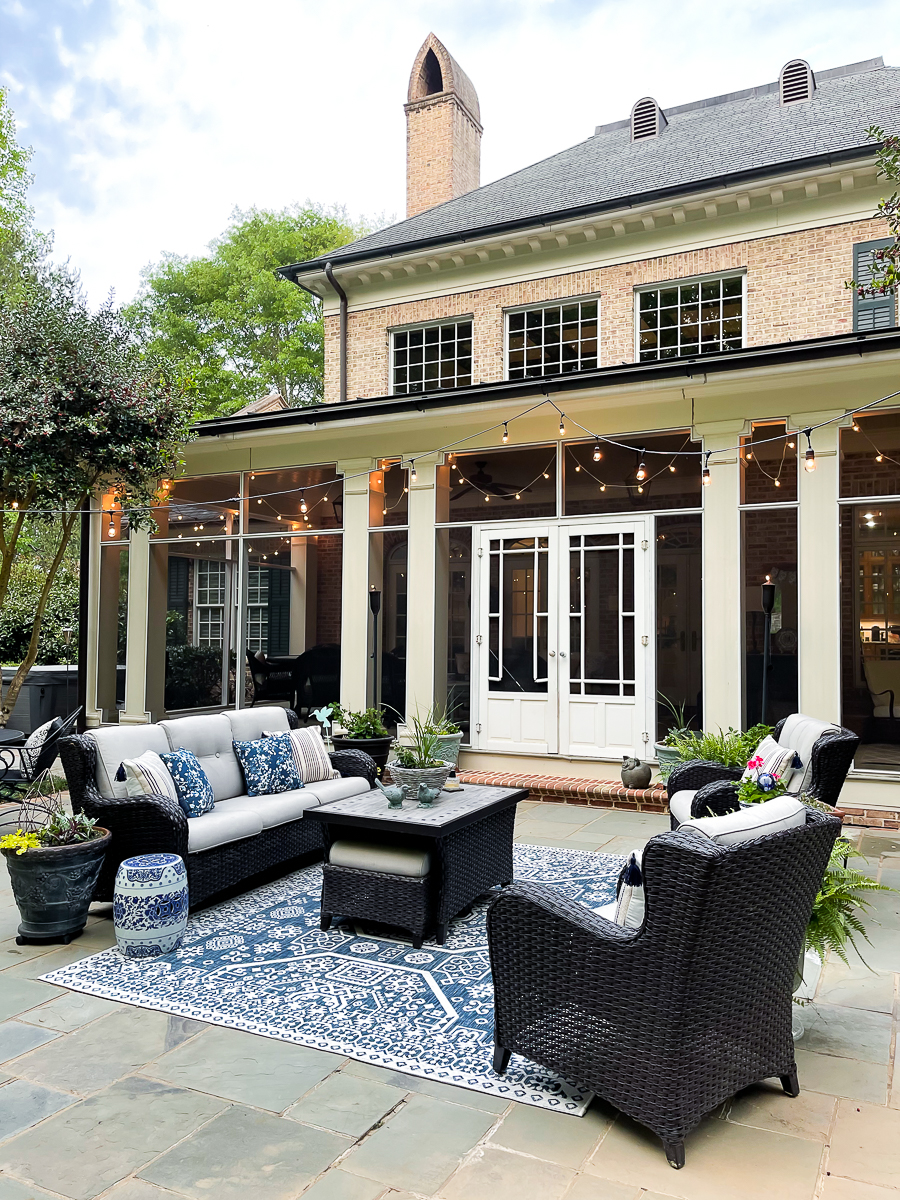
The Patio
Patio Set | Outdoor Rug | Similar Garden Stool
We ordered this set of 2 string light poles from Amazon. We were going to try using them in the ground first. If they didn't hold securely, we were going to move them to pots. They were supposed to be here in 2 days. They became delayed by one month. I had already been waiting years for this project, but now it had to be done. I canceled the order. They look like a fabulous option with pretty good reviews.
No way to plug in electric lights? You could try solar string lights. They have come a long way in recent years. These have excellent reviews.
Searching for options on Pinterest through the years, we came across many pole options.
- 2×2 wood
- treated lumber posts
- cedar posts
- bamboo stalks
- aluminum fencing posts
- posts from Amazon
- chain link fencing post
My biggest concern was that I didn't want large and chunky posts on the patio obstructing the view into the backyard and woods. I wanted them to blend more so treated lumber posts were a no-go for me.
We thought we wanted to use 8-foot aluminum fencing posts to match our backyard fence, but they are pricey. PLUS attaching the lights would be more of a challenge.
Ashlyn and I even cut bamboo stalks from the edge of our woods last summer and let them dry out. I still have these. We just weren't crazy about the look.
I was starting to lean towards using the 2×2 posts like my dear friend, Shannon, from Fox Hollow Cottage used in her recent post. Honestly, her post and beautiful deck inspired me to finally get this long-awaited project in motion. Be sure to check it out.
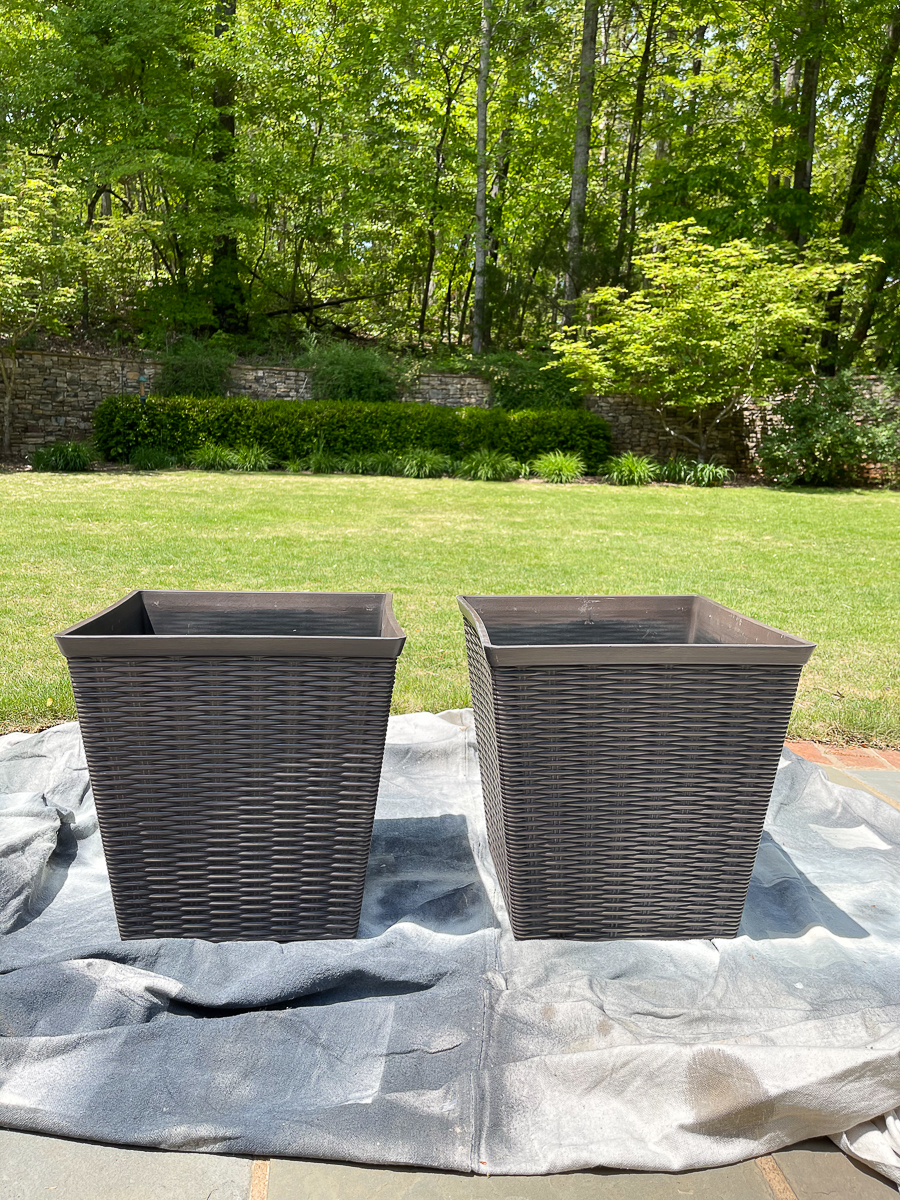
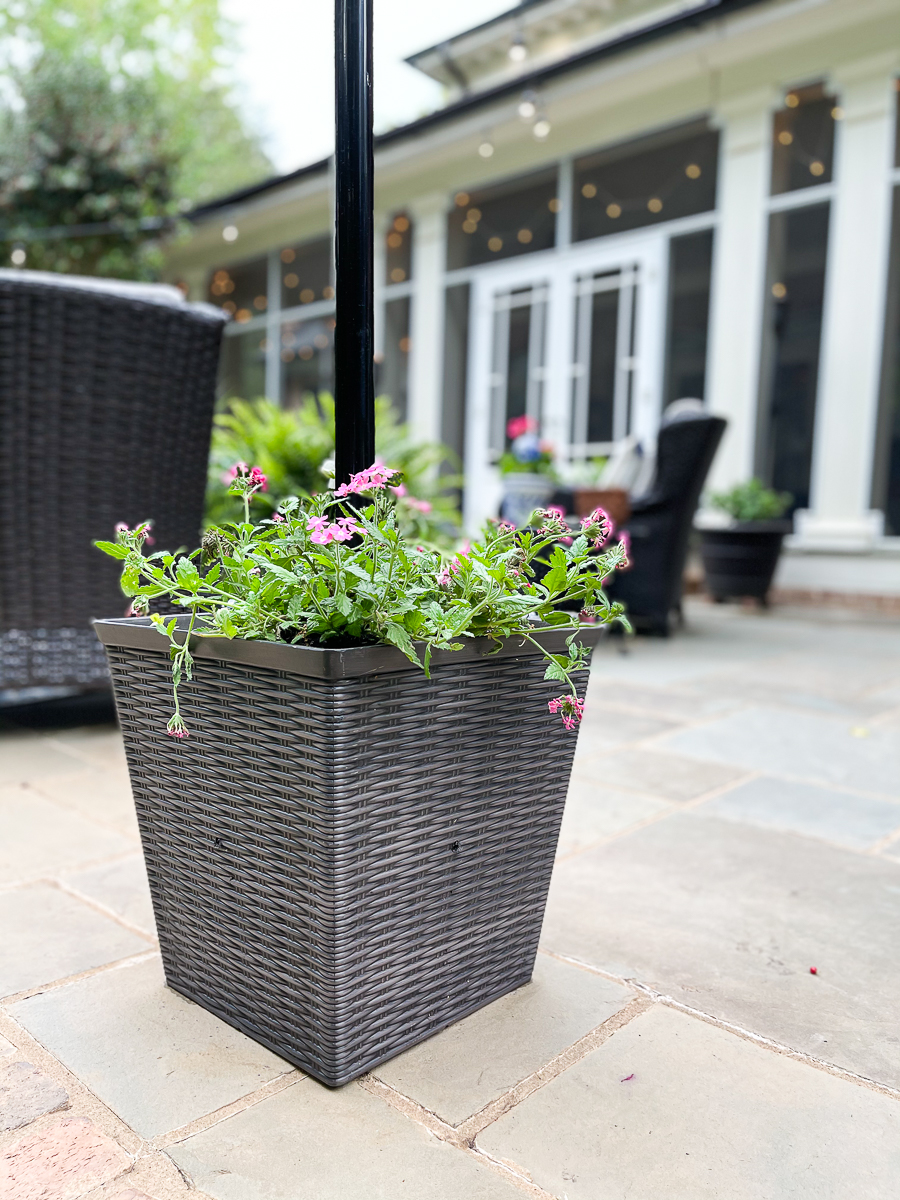
I found the perfect plastic pots with a wicker look that matched our outdoor furniture. They were just the shape that I was looking for. I did not want to worry about anything tipping over. I've had large, heavy pots with trees in them that have repeatedly blow over. These pots came from Old Time Pottery.
I wanted a pretty square planter that would allow me enough planting space above the line of concrete. It also needs to be big enough to not potentially tip over due to the long lengths of string lights that we would need.
On a whim, Ashlyn and I went to Lowes with purpose and picked up our 8-foot 2×2 posts. They had the footprint that I wanted for the patio. I was going to stain them so they would blend in with the holly tree trunks flanking the patio.
When I got home with them, my husband was afraid that with the 8-foot height and the longer length that we had to go to attach to the house that they would warp over time. If going with a shorter post, it would be fine.
We actually used these same 2×2 8-foot poles last summer on my mom's deck. We hung string lights for here there for Mother's Day. I really need to take photos of it. She loves it!!! The 8-foot length works there because they are attached to the deck for support.
Low and behold, I had another option in my back pocket. PLUS it's affordable. I'd prefer the stained wood look, but this option looks fabulous. It's like it was made for string lights. Be sure to check out Kim from Today's Creative Life. She's where I got the idea to use these black chain link posts with needle hook tops. It was the perfect solution for the long lengths of lights and was in line with our original want of matching our black aluminum fencing. This is another gorgeous backyard setting to check out. I am so crushing on Kim's outdoor fireplace. Our patio was built in 2004 with plans for a fireplace.
Supplies We Used
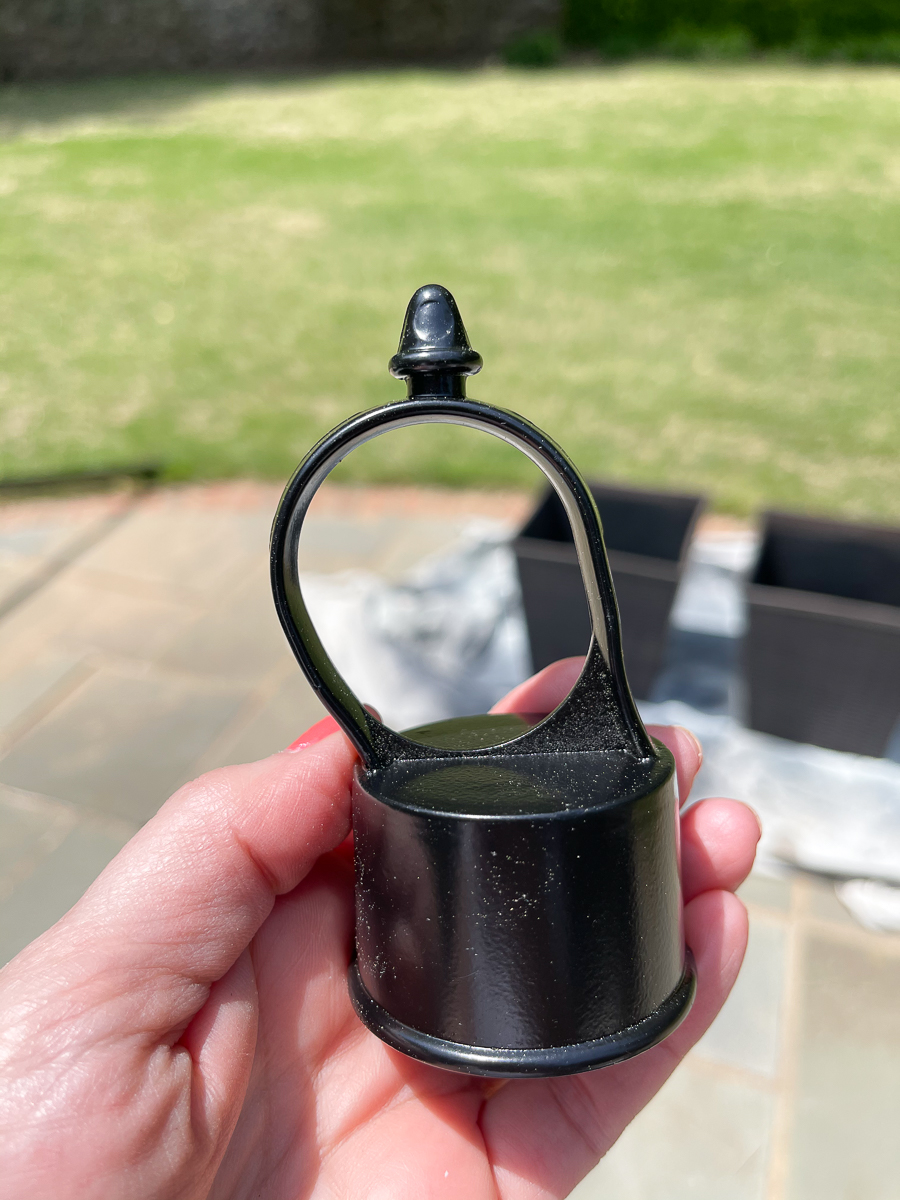
- 2-8 foot black chain link fence posts
- 2-black needle caps or these caps
- 2- 60-pound bags of concrete
- 2 plastic planters/containers (mine came from Old Time Pottery)
- 2 strands of string lights – be sure to clip the coupon
- outdoor remote control
- cup hooks
- You may want this wire kit for hanging
Instructions

The Concrete
First, we used 1-60 pound bag of concrete in each container. You'll want 2 people for this project if possible.
We didn't measure out the water. My husband had done enough concrete with pasture fence posts for our former horses that he was used to it. Follow the instructions of the bag, but this is how we did it.
Make sure if your pot has drainage holes they are covered in some way. Mine had removable plugs that we left intact.
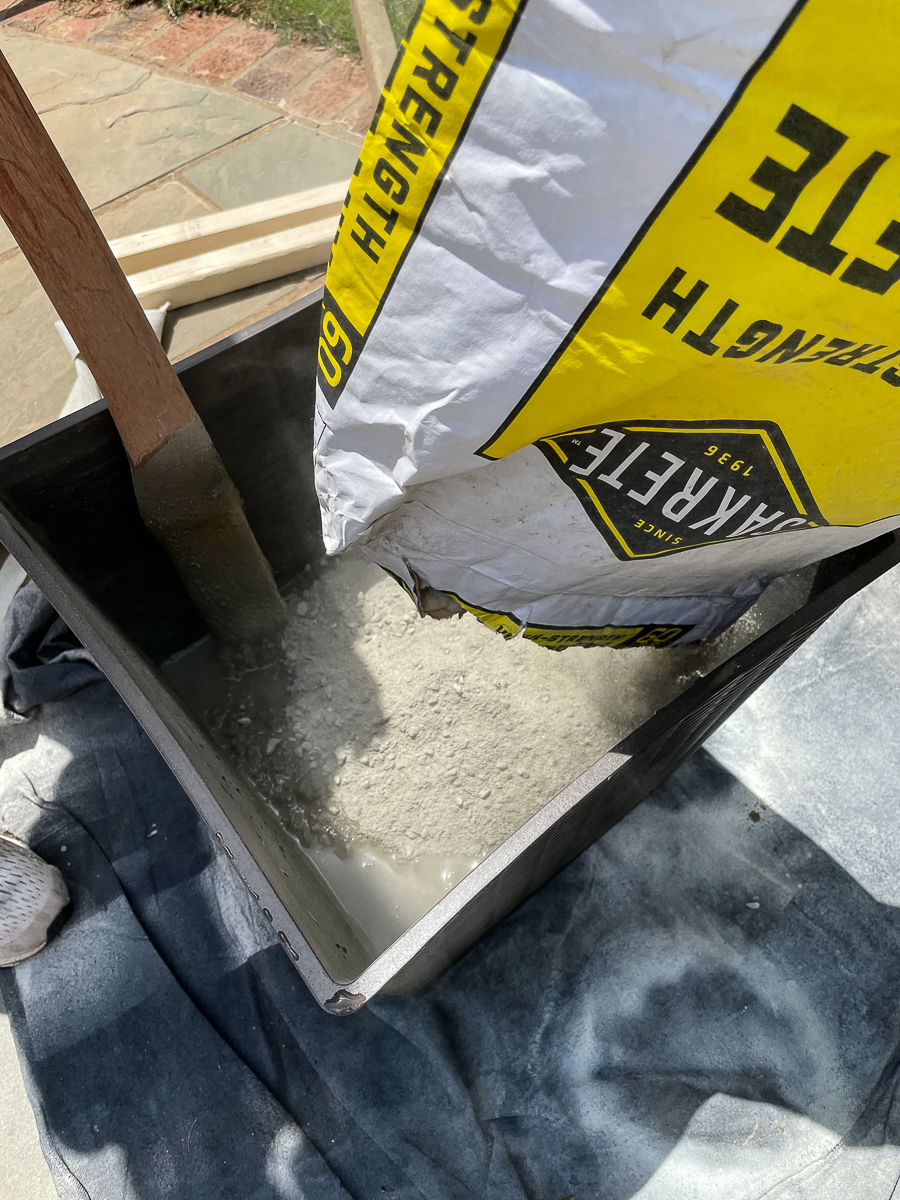
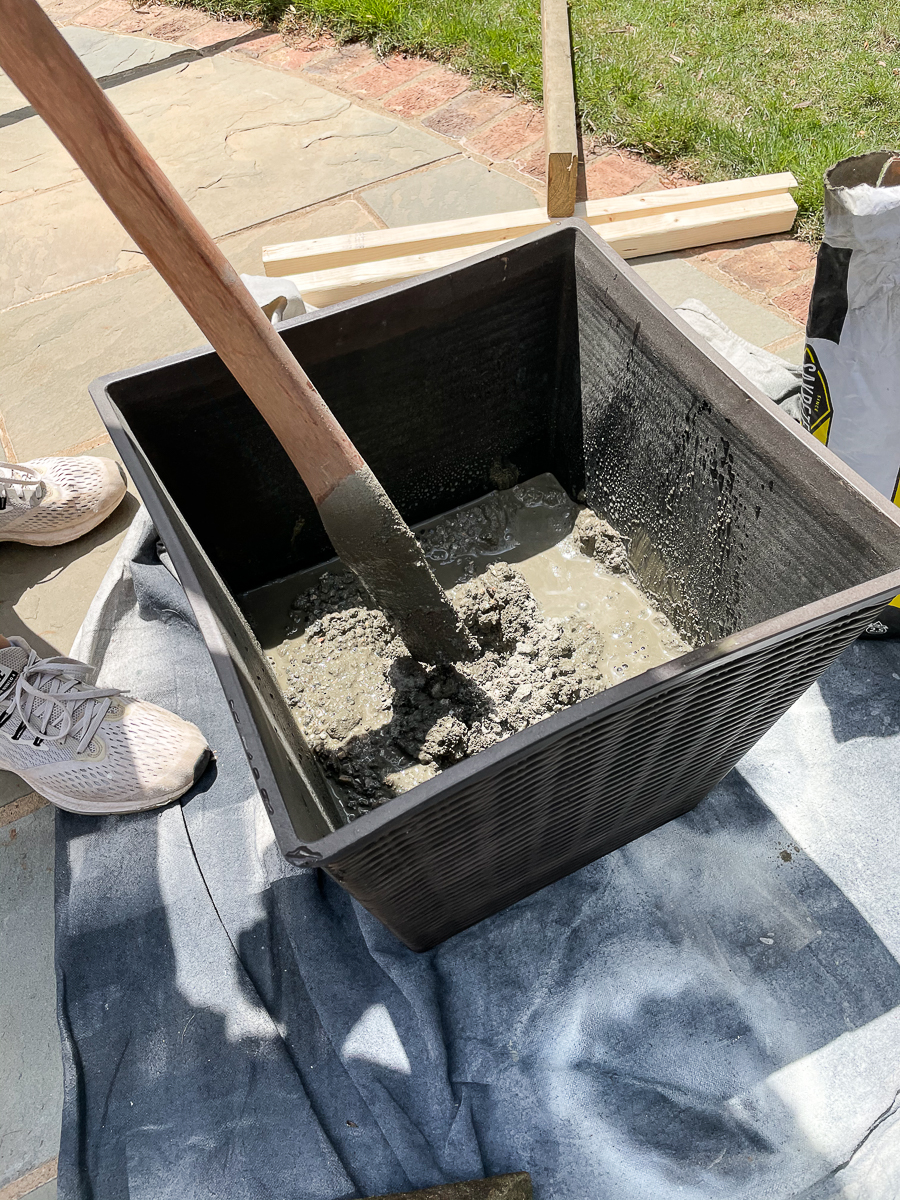
We sprayed a bit of water in the bottom of the pot before adding the entire bag of concrete. Then with the hose, he added between 3/4 to a gallon of water. With a stick stir it well until combined. You want to work rather quickly.
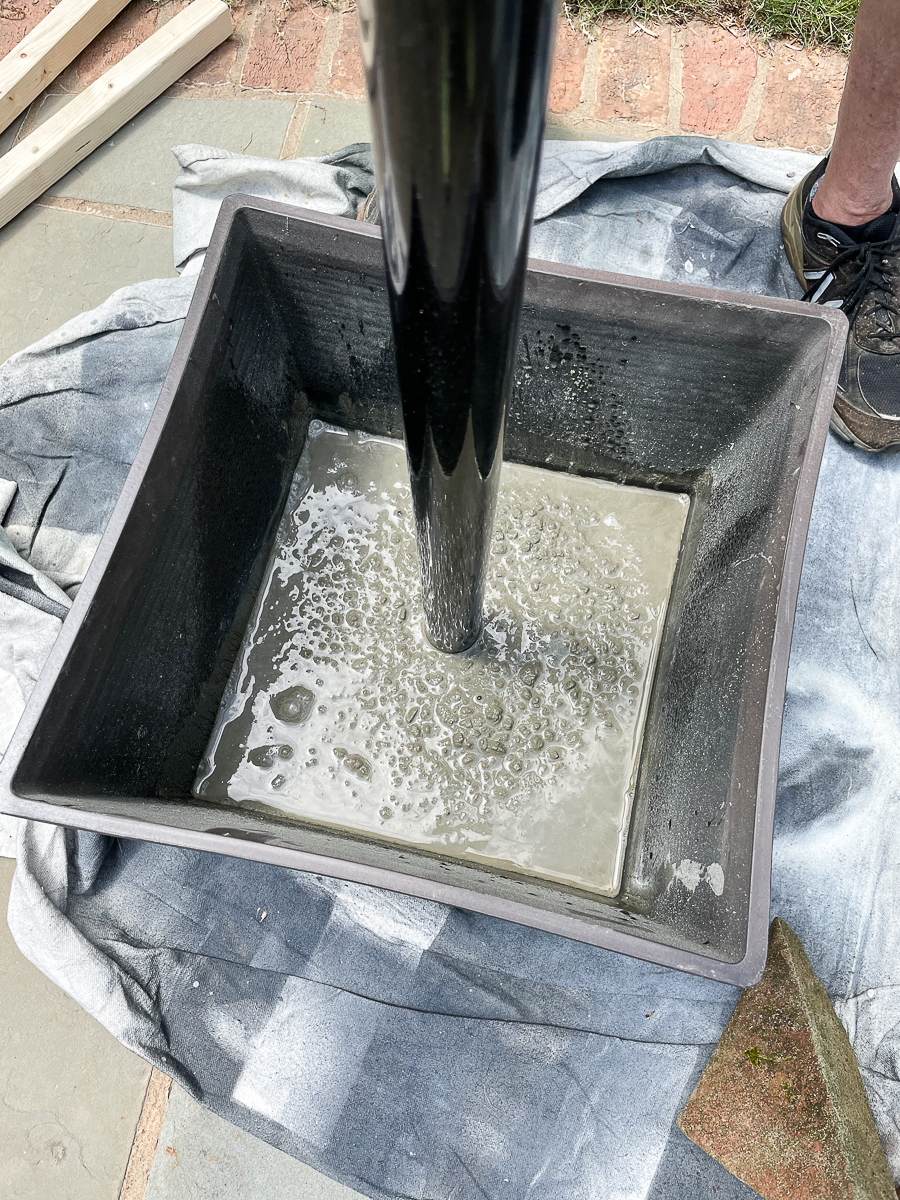
The Poles
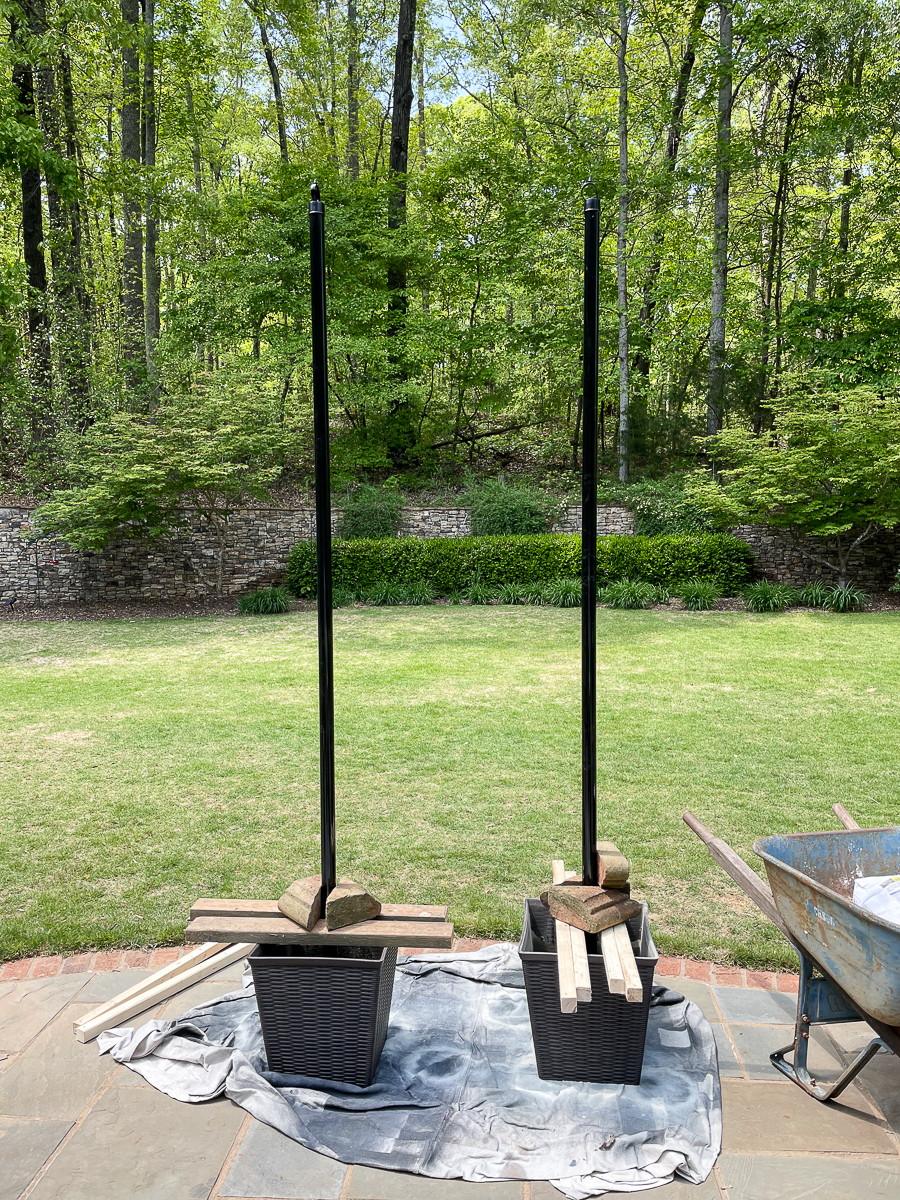
Insert your post and center it in the pot as best as you can. You can use a tape measure to do this. We were fortunate in that our local Lowes had the black posts in stock for the project and required no painting. You could purchase the galvanized ones and spray paint them. I highly recommend the black. In 2024, they still look perfect.
2024 Update: The 8 ft posts are not showing up online. They have 6, 7, and 10 ft. sections. 8 ft. may be an instore only option. Just pop in your local Lowes or Home Depot to check stock. You want them on the taller side. The 8 ft. is perfect!
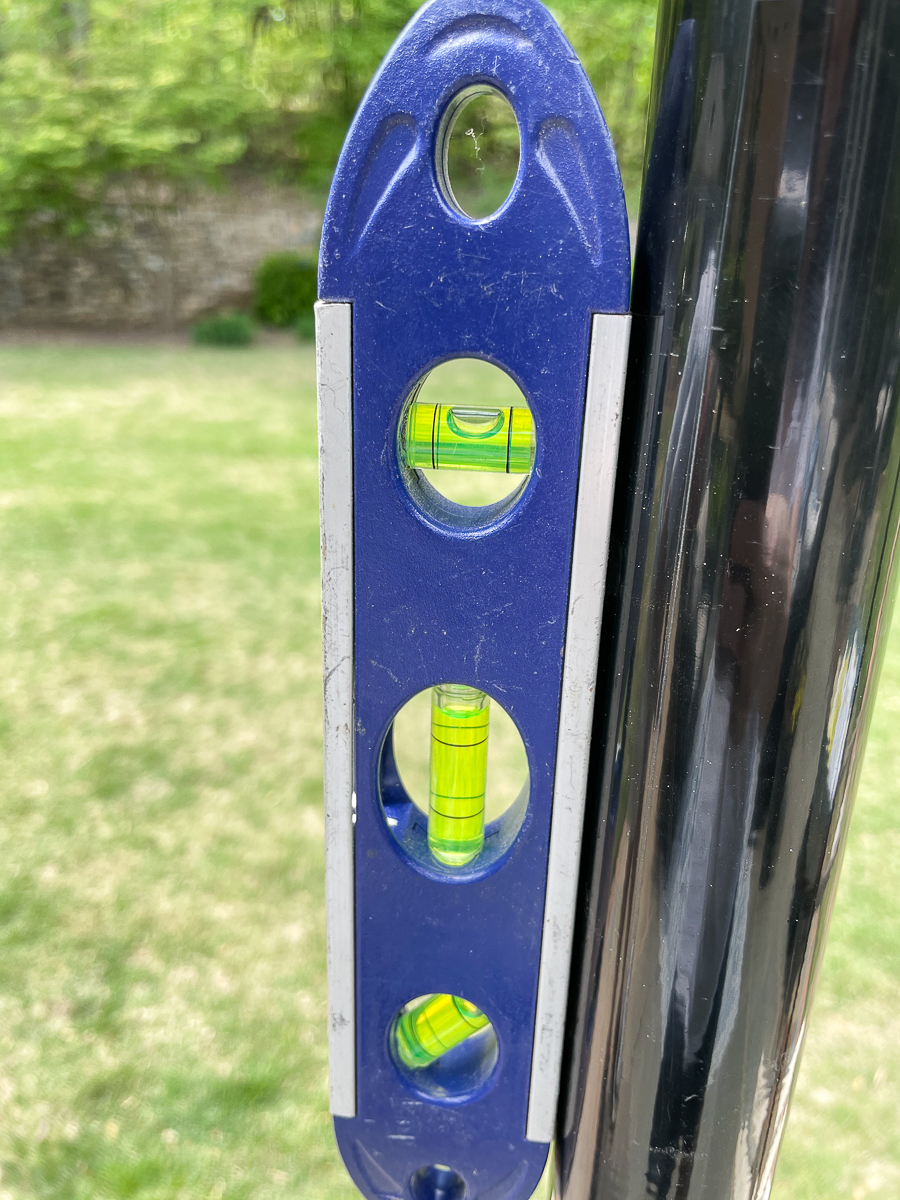
While one person holds the pole, have another go around the pole to level it.
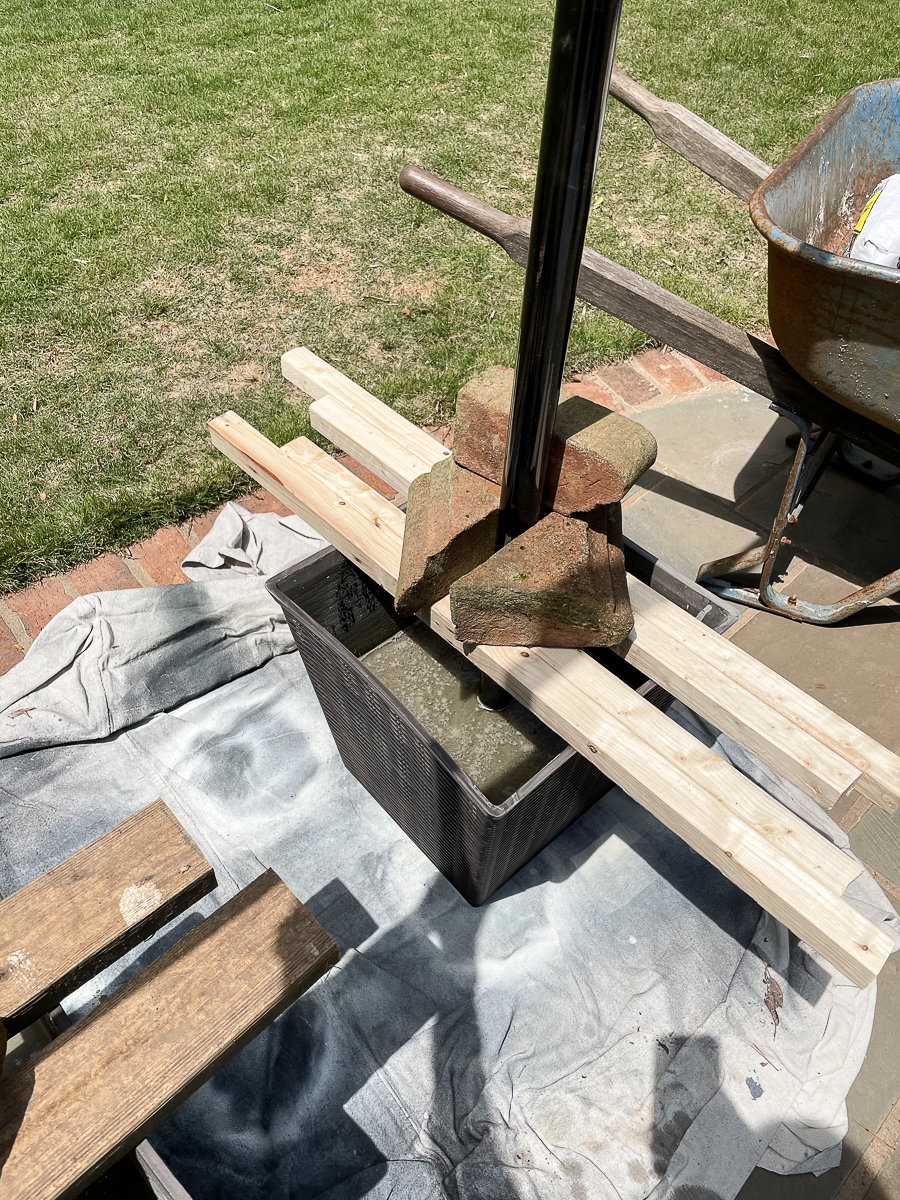
We cut the 2×2 posts that I bought into pieces to anchor the poles in place with bricks to steady them while the concrete set up.
In one of the pots, we added a bit too much water. That was ok. It just took a little longer for the water to absorb and evaporate off of the surface with the sun.
We let them set up for a good 24 hours before hanging the lights.
Installing the Lights
We used 2 sets of lights. I started hanging them on the side that would not plug into an outlet. We were going to bring them to the other side of the house where they would plug in so we wanted all the extra on that side. It worked out perfectly!
TIP: Do NOT install bulbs until after the line is installed.
Please make sure you do not attach the bulbs until after you string the lights. You'll need to thread the lights through the needle top without bulbs anyway. This will eliminate potential bulb breakage during installation. If you have to join any strands, use black electrical tape to secure the connection. Then secure the 2 ends with black zip ties for extra strength. This way you won't have to worry about the weight disengaging connected strands. I was messing with a strand before doing this and shattered a bulb.
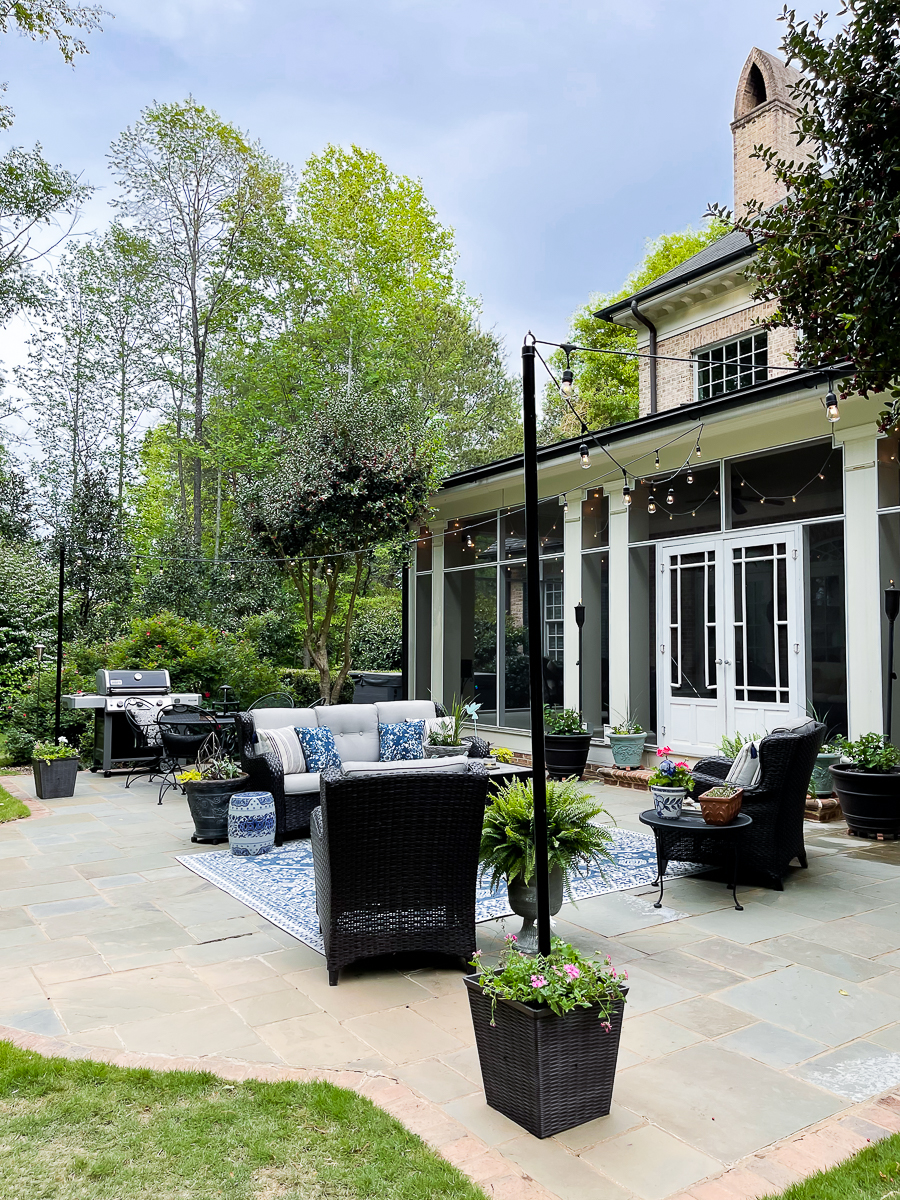
Right now our lights are working well without having to use guide wires. I like the relaxed look of the swoop. We may go back and add guide wires. I know that using guide wires keeps them more stable and less strain on the wires themselves in terms of wearing out.
As of 2024, we have not added guide wires, and still in perfect working order.
Planting the Flowers
Fill with potting soil and plant your flowers. Use a drill to drill drainage holes for your flowers right above the concrete line.
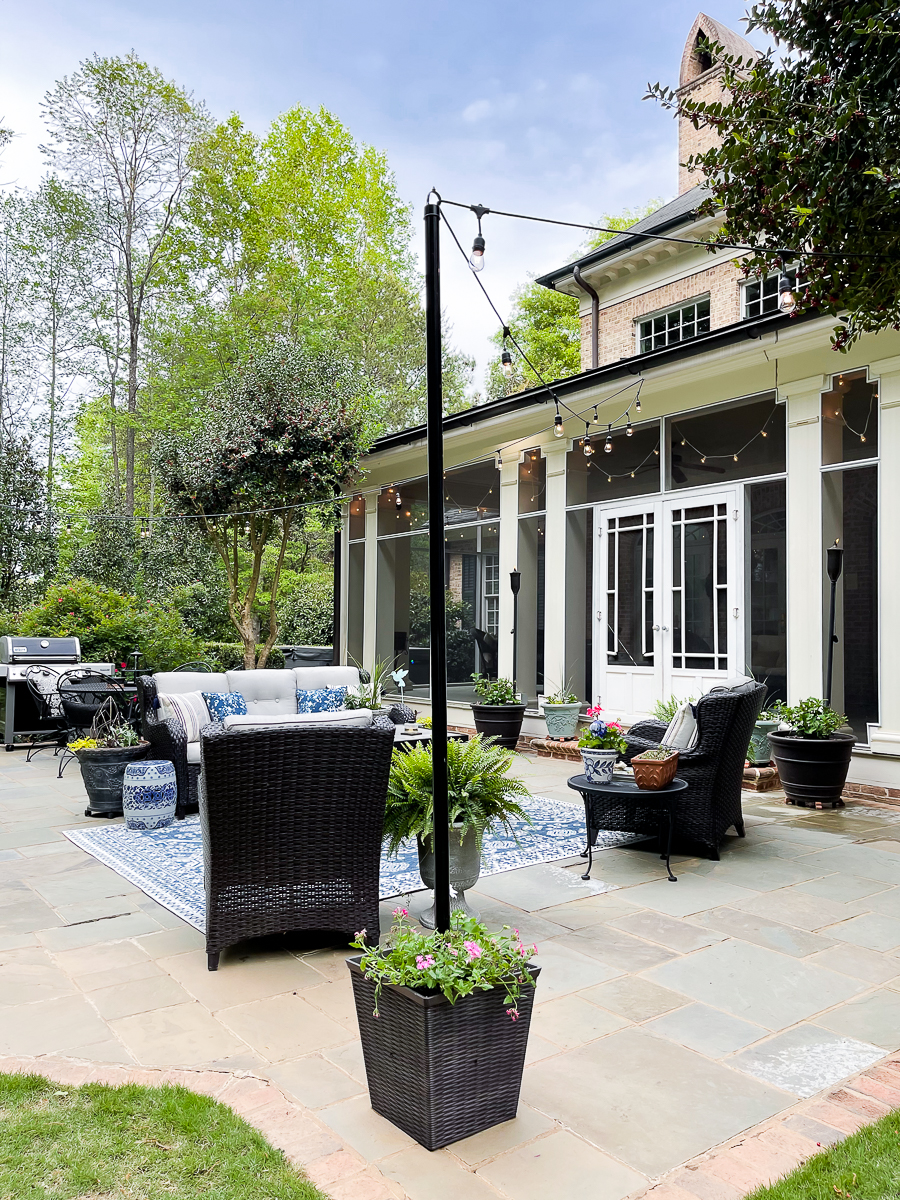
We are so in love with the patio now. All it's missing is that fireplace! I'd love to replace our wrought iron table with a rectangular table one day.
See more recent posts about our outdoor spaces!
Be sure to check out the amazing patios and string light inspiration from my blogging friends mentioned above!


Christy has been creating content for Our Southern Home since 2012. She has been featured in numerous print and online publications. Her classic, eclectic design approach spans her home and fashion style. Christy has a way of mixing store-bought with thrift store, antique and vintage finds. As a recent empty nester, she is having fun navigating this new stage of life. Read more about Christy HERE. Be sure to subscribe below. You can also contact me HERE.


These look fabulous, and you really came up with a fantastic solution! My daughter just moved into a new apartment with a HUGE patio! She is on the ground floor and would love to have some lighting out there. I am sure this could be the answer for her! I am sending this on to her right now, and hoping she takes this on!!
Your patio looks fabulous, Christy!!! We have wayyyy too many mosquitoes in SE Texas to use ours in the evening.
Fantastic solution and I love the look!
Thanks so much! We are really enjoying them!